Learning how to configure and utilize Azure DevOps self-hosted agents for custom pipelines, optimizing your CI/CD workflows.
In today’s fast-paced development world, automation is key to maintaining efficiency. Azure DevOps offers a powerful platform for building, testing, and deploying applications, and its self-hosted agents provide an additional layer of customization and control. In this post, we’ll explore how to set up and utilize Azure DevOps self-hosted agents to create custom pipelines that better fit your needs.
What Are Self-Hosted Agents?
Self-hosted agents are virtual machines (VMs) or physical machines that you set up and manage yourself. These agents run your Azure DevOps pipelines on your hardware, giving you more flexibility compared to Microsoft’s hosted agents. Self-hosted agents can be particularly useful when you need specific tools, configurations, or a particular environment that the default Microsoft-hosted agents don’t provide.
Benefits of Self-Hosted Agents
Custom Environments: With self-hosted agents, you have full control over the environment. You can install the necessary tools, SDKs, and dependencies that are specific to your project.
Faster Builds: If you have powerful machines with optimized configurations, you can speed up your build and test processes by using your own agents.
Security and Compliance: Self-hosted agents allow you to manage sensitive data locally. You can isolate your builds and tests in a controlled environment, enhancing security.
Setting Up a Self-Hosted Agent
Setting up a self-hosted agent involves a few key steps:
Prepare Your Machine: Start by ensuring the machine you want to use as a self-hosted agent meets the requirements. This includes installing the necessary operating system and dependencies. Ensure that the machine is capable of handling the workload required by your CI/CD pipelines.
Download the Agent: In your Azure DevOps portal, navigate to the Agent Pools section under Project Settings. From there, you can download the agent installation package specific to your operating system.
Install the Agent: Once the agent is downloaded, unzip the contents and run the configuration script to register the agent with your Azure DevOps organization. During the configuration process, you’ll need to authenticate the agent with your Azure DevOps account and assign it to a specific agent pool.
Start the Agent: After the configuration, start the agent. It will now be available to run jobs in your pipelines. To verify that it’s working correctly, run a test pipeline and check if the self-hosted agent executes the job successfully.
Automating Self Hosted Agent Deployment
Once your self-hosted agent is up and running, you can automate the deployment of resources such as virtual machines using Infrastructure as Code (IaC). IaC allows you to manage and provision infrastructure through code rather than manual intervention, making it repeatable and scalable.
In this case, we can use Azure CLI to deploy a virtual machine using an Azure Resource Manager (ARM) template or a Bicep file. Here’s an example of how you can create a VM using a simple Azure CLI command for IaC deployment:
Info
Please ensure Microsoft.AzureCLI and Microsoft.Bicep are installed
targetScope='subscription'// Imported Values@description('The location of the resources')paramlocationstring@description('The short code of the location')paramlocationShortCodestring@description('The environment type')@allowed(['dev''acc''prod'])paramenvironmentTypestring@description('The Public IP Address')parampublicIpstring@description('The name of the virtual machine')paramvmHostNamestring='devops-agent-${environmentType}-${locationShortCode}'@description('The Local User Account Name')paramvmUserNamestring@description('The Local User Account Password')@secure()paramvmUserPasswordstring@description('The Resource Group Name')paramresourceGroupNamestring='rg-azure-devops-agent-${environmentType}-${locationShortCode}'@description('The Network Security Group Name')paramnetworkSecurityGroupNamestring='nsg-devops-agent-${locationShortCode}'@description('The Virtual Network Name')paramvirtualNetworkNamestring='vnet-hosted-agents-${environmentType}-${locationShortCode}'@description('The Subnet Name')paramsubnetNamestring='snet-hosted-agents'//// Azure Verified ModulesmodulecreateResourceGroup'br/public:avm/res/resources/resource-group:0.4.0'={name:'createResourceGroup'params:{name:resourceGroupNamelocation:location}}modulecreateNetworkSecurityGroup'br/public:avm/res/network/network-security-group:0.5.0'={name:'createNetworkSecurityGroup'scope:resourceGroup(resourceGroupName)params:{name:networkSecurityGroupNamelocation:locationsecurityRules:[{name:'ALLOW_SSH_INBOUND_TCP'properties:{priority:100access:'Allow'direction:'Inbound'protocol:'Tcp'sourceAddressPrefix:publicIpsourcePortRange:'*'destinationAddressPrefix:'*'destinationPortRange:'22'}}]}dependsOn:[createResourceGroup]}modulecreateVirtualNetwork'br/public:avm/res/network/virtual-network:0.5.1'={name:'create-virtual-network'scope:resourceGroup(resourceGroupName)params:{name:virtualNetworkNamelocation:locationaddressPrefixes:['10.0.0.0/24']subnets:[{name:subnetNameaddressPrefix:'10.0.0.0/24'networkSecurityGroupResourceId:createNetworkSecurityGroup.outputs.resourceId}]}dependsOn:[createResourceGroup]}modulecreateVirtualMachine'br/public:avm/res/compute/virtual-machine:0.8.0'={name:'create-virtual-machine'scope:resourceGroup(resourceGroupName)params:{name:vmHostNameadminUsername:vmUserNameadminPassword:vmUserPasswordlocation:locationosType:'Linux'vmSize:'Standard_B2ms'zone:0bootDiagnostics:truesecureBootEnabled:truevTpmEnabled:truesecurityType:'TrustedLaunch'imageReference:{publisher:'Canonical'offer:'ubuntu-24_04-lts'sku:'server'version:'latest'}nicConfigurations:[{ipConfigurations:[{name:'ipconfig01'pipConfiguration:{name:'${vmHostName}-pip-01'}subnetResourceId:createVirtualNetwork.outputs.subnetResourceIds[0]}]nicSuffix:'-nic-01'enableAcceleratedNetworking:false}]osDisk:{caching:'ReadWrite'diskSizeGB:128managedDisk:{storageAccountType:'Premium_LRS'}}}dependsOn:[createVirtualNetwork]}
Next you’ll need a deployment Wrapper, Save the PowerShell script for example as Invoke-AzDeployment.ps1, then calling the script:
param([Parameter(Mandatory=$true,Position=0,HelpMessage="Deployment Guid is required")][validateSet('tenant','mgmt','sub')][string]$targetScope,[Parameter(Mandatory=$true,Position=1,HelpMessage="Subscription ID is required.")][string]$subscriptionId,[Parameter(Mandatory=$true,Position=2,HelpMessage="Location is required.")][ValidateSet("eastus","eastus2","eastus3","westus","westus2","westus3","northcentralus","southcentralus","centralus","canadacentral","canadaeast","brazilsouth","northeurope","westeurope","uksouth","ukwest","francecentral","francesouth","germanywestcentral","germanynorth","switzerlandnorth","switzerlandwest","norwayeast","norwaywest","swedencentral","swedensouth","polandcentral","qatarcentral","uaenorth","uaecentral","southafricanorth","southafricawest","eastasia","southeastasia","japaneast","japanwest","australiaeast","australiasoutheast","australiacentral","australiacentral2","centralindia","southindia","westindia","koreacentral","koreasouth","chinaeast","chinanorth","chinaeast2","chinanorth2","usgovvirginia","usgovarizona","usgovtexas","usgoviowa")][string]$location,[Parameter(Mandatory=$true,Position=3,HelpMessage="Environment Type is required.")][validateSet('dev','acc','prod')][string]$environmentType,[Parameter(Mandatory=$false,Position=4,HelpMessage="Enabled Bicep Deployment")][switch]$deploy)# PowerShell Functions# Function - New-RandomPasswordfunctionNew-RandomPassword{param([Parameter(Mandatory)][int]$length,[int]$amountOfNonAlphanumeric=2)$nonAlphaNumericChars='!@$'$nonAlphaNumericPart=-join((Get-Random-Count$amountOfNonAlphanumeric-InputObject$nonAlphaNumericChars.ToCharArray()))$alphabet='ABCDEFGHIJKLMNOPQRSTUVWXYZabcdefghijklmnopqrstuvwxyz0123456789'$alphabetPart=-join((Get-Random-Count($length-$amountOfNonAlphanumeric)-InputObject$alphabet.ToCharArray()))$password=($alphabetPart+$nonAlphaNumericPart).ToCharArray()|Sort-Object{Get-Random}return-join$password}# Function - Get-BicepVersionfunctionGet-BicepVersion{#Write-Output`r "Checking for Bicep CLI..."# Get the installed version of Bicep$installedVersion=azbicepversion--only-show-errors|Select-String-Pattern'Bicep CLI version (\d+\.\d+\.\d+)'|ForEach-Object{$_.Matches.Groups[1].Value}if(-not$installedVersion){Write-Output"Bicep CLI is not installed or version couldn't be determined."return}Write-Output"Installed Bicep version: $installedVersion"# Get the latest release version from GitHub$latestRelease=Invoke-RestMethod-Uri"https://api.github.com/repos/Azure/bicep/releases/latest"if(-not$latestRelease){Write-Output"Unable to fetch the latest release."return}$latestVersion=$latestRelease.tag_name.TrimStart('v')# GitHub version starts with 'v'# Compare versionsif($installedVersion-eq$latestVersion){Write-Output"Bicep is up to date."`r
}else{Write-Output"A new version of Bicep is available. Latest Release is: $latestVersion."# Prompt for user input (Yes/No)$response=Read-Host"Do you want to update? (Y/N)"if($response-match'^[Yy]$'){Write-Output""# Required for Verbose SpacingazbicepupgradeWrite-Output"Bicep has been updated to version $latestVersion."}elseif($response-match'^[Nn]$'){Write-Output"Update canceled."}else{Write-Output"Invalid response. Please answer with Y or N."}}}# PowerShell Location Shortcode Map$LocationShortcodeMap=@{"eastus"="eus""eastus2"="eus2""eastus3"="eus3""westus"="wus""westus2"="wus2""westus3"="wus3""northcentralus"="ncus""southcentralus"="scus""centralus"="cus""canadacentral"="canc""canadaeast"="cane""brazilsouth"="brs""northeurope"="neu""westeurope"="weu""uksouth"="uks""ukwest"="ukw""francecentral"="frc""francesouth"="frs""germanywestcentral"="gwc""germanynorth"="gn""switzerlandnorth"="chn""switzerlandwest"="chw""norwayeast"="noe""norwaywest"="now""swedencentral"="sec""swedensouth"="ses""polandcentral"="plc""qatarcentral"="qtc""uaenorth"="uan""uaecentral"="uac""southafricanorth"="san""southafricawest"="saw""eastasia"="ea""southeastasia"="sea""japaneast"="jpe""japanwest"="jpw""australiaeast"="aue""australiasoutheast"="ause""australiacentral"="auc""australiacentral2"="auc2""centralindia"="cin""southindia"="sin""westindia"="win""koreacentral"="korc""koreasouth"="kors""chinaeast"="ce""chinanorth"="cn""chinaeast2"="ce2""chinanorth2"="cn2""usgovvirginia"="usgv""usgovarizona"="usga""usgovtexas"="usgt""usgoviowa"="usgi"}$shortcode=$LocationShortcodeMap[$location]# Create Deployment Guid for Tracking in Azure$deployGuid=(New-Guid).Guid# Get User Public IP Address$publicIp=(Invoke-RestMethod-Uri'https://ifconfig.me')# Virtual Machine Credentials$vmUserName='azurevmuser'$vmUserPassword=New-RandomPassword-length16# Check Azure Bicep VersionGet-BicepVersion# Azure CLI AuthenticationWrite-Output"> Logging into Azure for $subscriptionId"azlogin--outputnone--only-show-errors# Configure Azure Cli User Experienceazconfigset core.login_experience_v2=off--only-show-errorsWrite-Output"> Setting subscription to $subscriptionId"azaccountset --subscription$subscriptionIdWrite-Output`r "Pre Flight Variable Validation"Write-Output"Bicep File............: $bicepFile"Write-Output"Deployment Guid......: $deployGuid"Write-Output"Location.............: $location"Write-Output"Location Shortcode...: $shortcode"if($deploy){$deployStartTime=Get-Date-Format'HH:mm:ss'# Deploy Bicep Template$azDeployGuidLink="`e]8;;https://portal.azure.com/#view/HubsExtension/DeploymentDetailsBlade/~/overview/id/%2Fsubscriptions%2F$subscriptionId%2Fproviders%2FMicrosoft.Resources%2Fdeployments%2Fiac-$deployGuid`e\iac-$deployGuid`e]8;;`e\"Write-Output`r "> Deployment [$azDeployGuidLink] Started at $deployStartTime"azdeploymentsubcreate`--nameiac-$deployGuid`--location$location`--template-file.\main.bicep`--parameters`location=$location`locationShortCode=$shortcode`environmentType=$environmentType`publicIp=$publicIp`vmUserName=$vmUserName`vmUserPassword=$vmUserPassword`--confirm-with-what-if`--outputnone$deployEndTime=Get-Date-Format'HH:mm:ss'$timeDifference=New-TimeSpan-Start$deployStartTime-End$deployEndTime;$deploymentDuration="{0:hh\:mm\:ss}"-f$timeDifferenceWrite-Output`r "> Deployment [iac-$deployGuid] Started at $deployEndTime - Deployment Duration: $deploymentDuration"Write-Output`r "Credentials"Write-Output"VM Username: $vmUserName"Write-Output"VM Password: $vmUserPassword"}
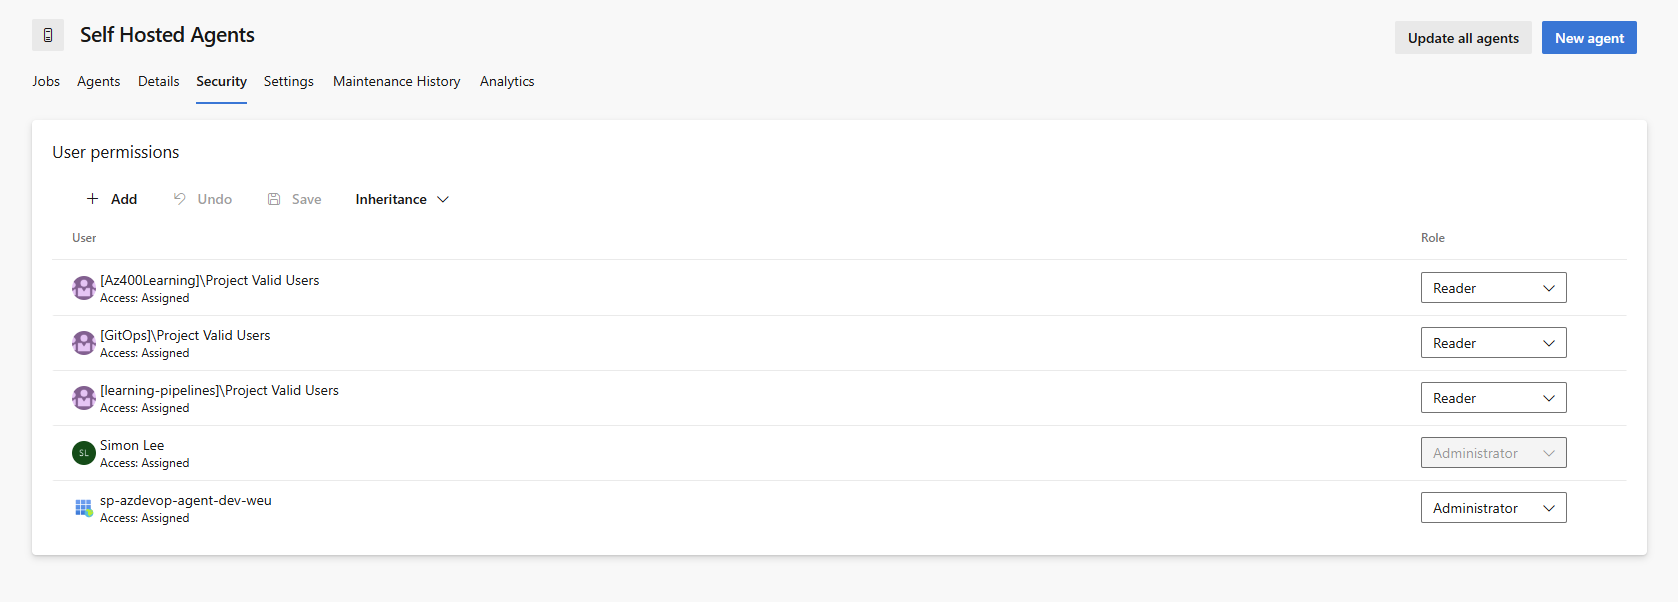
Adding Self Hosted Agent to Azure DevOps
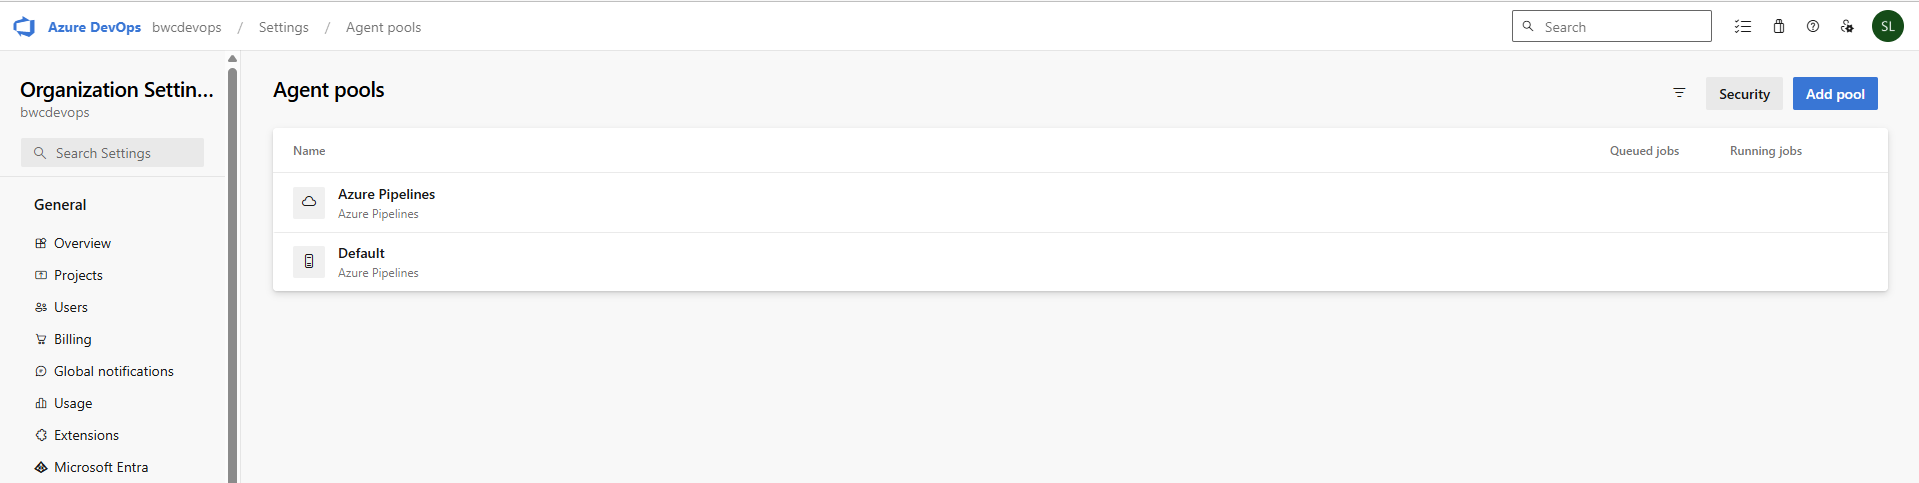
From your Azure DevOps environment, Head to Organisation Settings under Pipelines Agent Pools and you will find this screen:
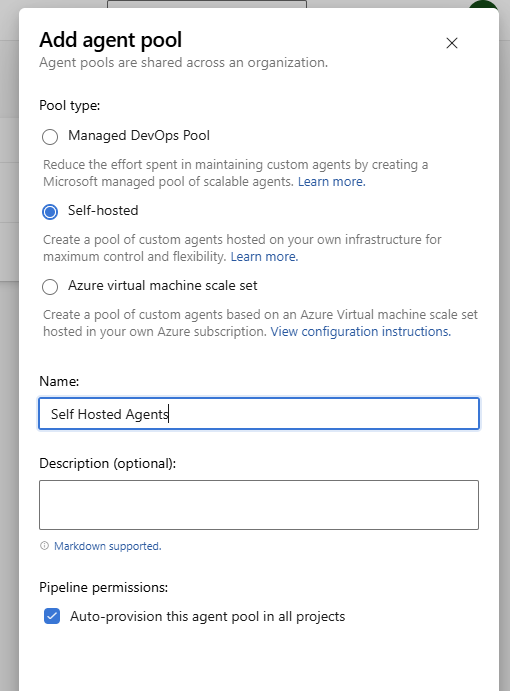
From here we want to create a new custom poll Self Hosted Agents
Once created you should see something like this in your Overview.
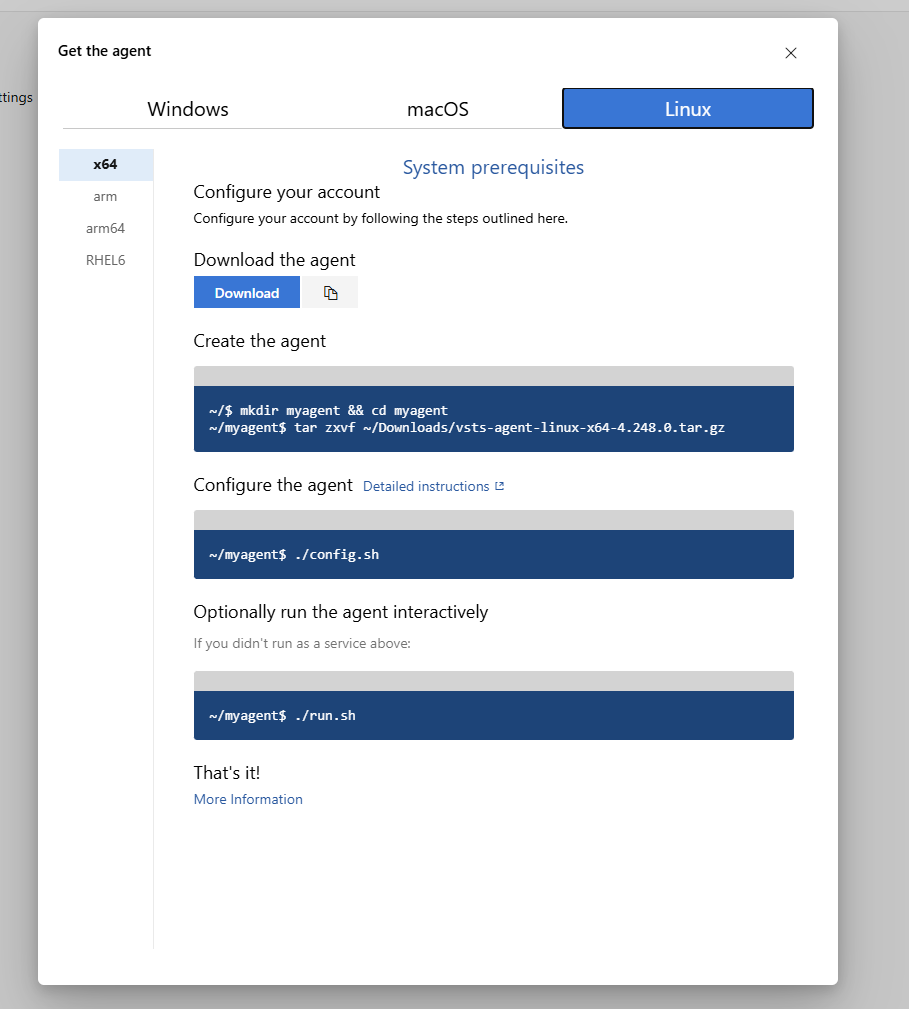
Click on the newly created pool and click on New Agent
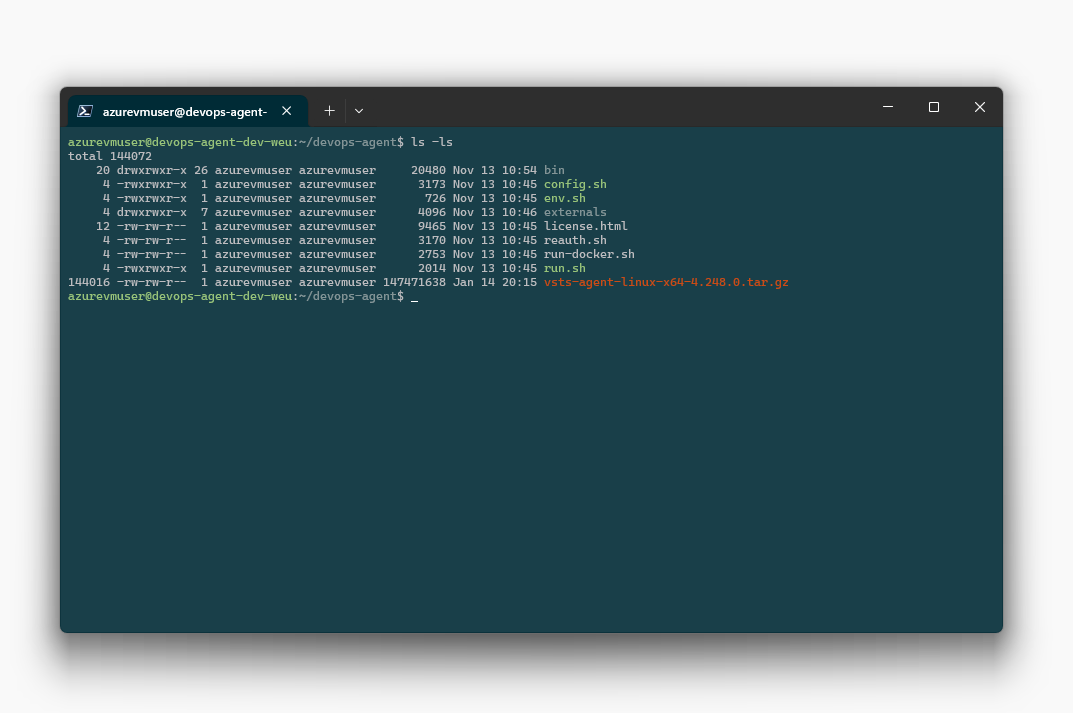
Once extracted, you will want to execute the following command:
1
./config.sh svc-devopsagent
When you are prompted for the Server URL, Please use the following: https://dev.azure.com/{your-organization} When you get to Enter authentication type enter SP If you want to use a Service Princiapl.
Warning
Please add the Service Principal into Azure DevOps BEFORE Running otherwise you get this error
1
2
3
4
5
6
7
8
9
10
Enter server URL > https://dev.azure.com/bwcdevops
Enter authentication type (press enter for PAT) > SP
Enter Client(App) ID > <client-id>
Enter Tenant ID > <tenant-id>
Enter Client secret > ****************************************
Error reported in diagnostic logs. Please examine the log for more details.
    - /home/azurevmuser/devops-agent/_diag/Agent_20250114-203042-utc.log
VS30063: You are not authorized to access https://dev.azure.com.
Failed to connect.  Try again or ctrl-c to quit
Enter server URL >
Important
What I found was I had to add the Service Princial as a User to Azure DevOps, Before I could add to an agnet pool group!
Self Hosted AGent with Service Princiapl - Microsoft Docs
Once the setup is completed you’ll see the new agent in the Agent Pool, abliet in Offline mode.
Starting the Agent
When setting up your self-hosted Azure DevOps agent, you can start it in one of three modes:
Manual
Single Run
Service
Each method has its use cases depending on your needs.
Manual Run
This mode is useful when you want to start the agent manually in a terminal session. The agent will continue to run as long as the terminal session remains active.
To start the agent manually, use the following command:
1
./run.sh
Single Run
If you want to run the agent for a single job and automatically exit once the job completes, use the –once flag. This is typically used when you need to trigger the agent for a specific task without leaving it running indefinitely.
To execute the agent in single-run mode, use:
1
./run.sh --once
Service
For persistent operation, you can install the agent as a service. This method ensures that the agent runs in the background and starts automatically with the system. It’s ideal for long-term setups where you want the agent to always be available.
This setup will ensure the agent runs as a service and is managed by your system’s init system (e.g., systemd on Linux), providing greater reliability for ongoing automation tasks.
Once the agent service has been brough online, You should see the agent online and happy in the portal!
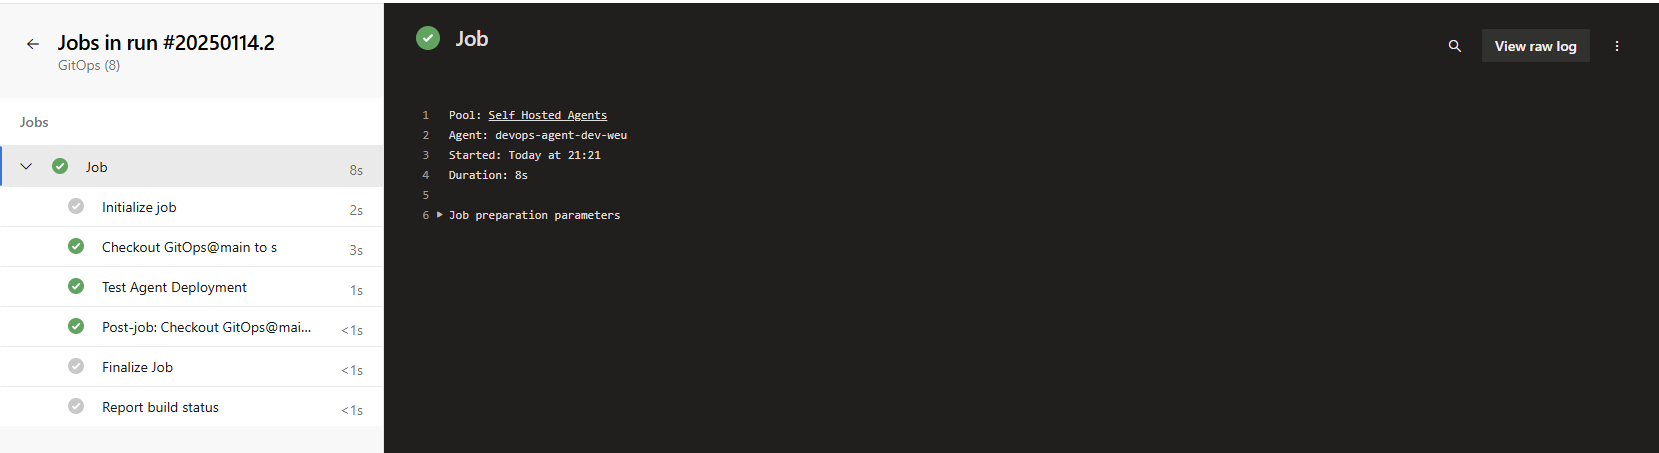
Using Self-Hosted Agents in Pipelines
Once your self-hosted agent is set up, you can specify it in your Azure DevOps pipeline. Here’s an example of how you might use it:
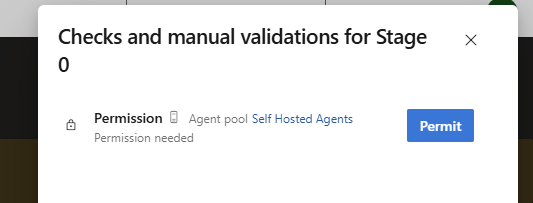
When you trigger the first run, the Job will initalize but pause due to pending authenticaiton.
Click View
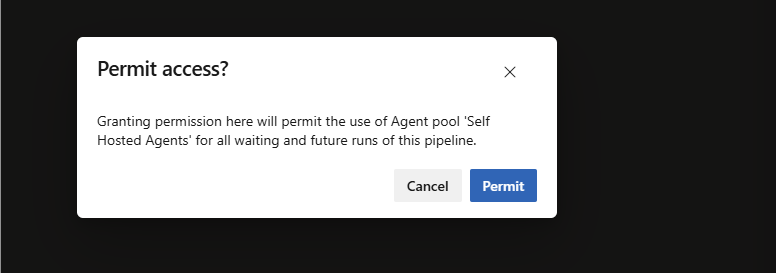
Click Permit
Click Permit
Troubleshooting Common Issues
Even with a well-followed setup guide, things don’t always go as planned. Here are some common troubleshooting steps:
Agent Not Picking Up Jobs
Make sure the agent is properly registered and connected. You can do this by checking the Agent Pools in the Azure DevOps portal to ensure the agent status is online.
Verify that the correct agent pool is referenced in the YAML pipeline.
Permissions Issues
Double-check that the agent has access to the necessary resources. If you’re running on a private network, ensure that the agent has network access to Azure DevOps servers.
Service Principal and PAT Token Authentication: If your agent needs to access Azure resources or other services, make sure the Service Principal (SP) or Personal Access Token (PAT) used by the agent has sufficient permissions.
Service Principal: For automated deployments, the Service Principal should have at least the Contributor role on the Azure subscription and sufficient permissions for resources it will interact with.
PAT Token: If you are using a PAT token to authenticate with Azure DevOps, ensure that the token has appropriate scopes (such as Agent Pools, Read & Execute, etc.) and is still valid (they typically expire after a set period).
Out of Disk Space or High CPU Usage
Review the resource utilization on the self-hosted agent machine. If resources are exhausted, consider scaling up the VM or allocating more resources to the agent.
Authentication Failures
Service Principal Secret Expired: If you’re using a Service Principal for authentication and it fails, verify that the client secret or certificate hasn’t expired. Regenerate it if necessary from the Azure portal.
PAT Token Expired: Check that your PAT token is still valid. Tokens are time-limited, so you’ll need to regenerate the token and update your Azure DevOps agent configuration if it has expired.
Wrap Up
Azure DevOps self-hosted agents provide a flexible and customizable solution for running CI/CD pipelines. By leveraging your own hardware or virtual machines, you gain control over the environment, the tools installed, and the security settings. Whether you’re dealing with specific dependencies, need faster builds, or require a tailored environment for compliance reasons, self-hosted agents offer a significant advantage.
In this post, we covered the steps for setting up a self-hosted agent, automating the deployment of virtual machines for agent use, and integrating those agents into your Azure DevOps pipelines. With Infrastructure as Code (IaC) solutions like Bicep and Azure CLI, you can easily deploy and manage the infrastructure for your self-hosted agents, ensuring scalability and repeatability.
By following the outlined steps, you can enhance your DevOps workflows with customized agents that better align with your project’s needs, driving efficiency, security, and control in your development and deployment processes.
Happy coding, and enjoy automating your Azure DevOps pipelines!